
Trailers require electrical connections to make towing safer for you and others on the road. While each state of the United States has laws and regulations governing everything from size limits to weight limits, they all have one thing: your trailer must have tail lights, brake lights, and turn signals wired. It is accomplished by connecting the trailer to the vehicle’s electrical system. Unfortunately, there are too many wires, colors, and a wide variety of Universal trailer wiring connectors. Where do we start wiring connections? A trailer wiring diagram.
Table of Contents
- What is a Trailer?
- How to Wire your Car or Truck to Pull a Trailer
- Trailer Wiring Harness notes
- Conclusion
What is a Trailer?
A trailer is an unpowered vehicle that should be towed by another vehicle: an SUV, pickup truck, or jeep usually pulls a trailer. Depending on their type, they can also be recreational vehicles.
A trailer is a separate extension vehicle that needs to be linked to the primary vehicle. The trailer is attached to the host vehicle using a suitable hitch. To make the power output of the trailer work, we use different connectors to make sure depending on the output we need. The most miniature output connector is a 4-way connector that provides electrical production for the trailer’s signal and floor and tail lights.
The trailer has several applications, depending on the user and the type of service. They transport goods, materials, boats, camping facilities, etc. The different types of trailers are as follows:
- utility trailer
- travel trailer
- boat trailer
- semi-trailer
- construction trailer
- gooseneck trailer
- fifth wheel trailer
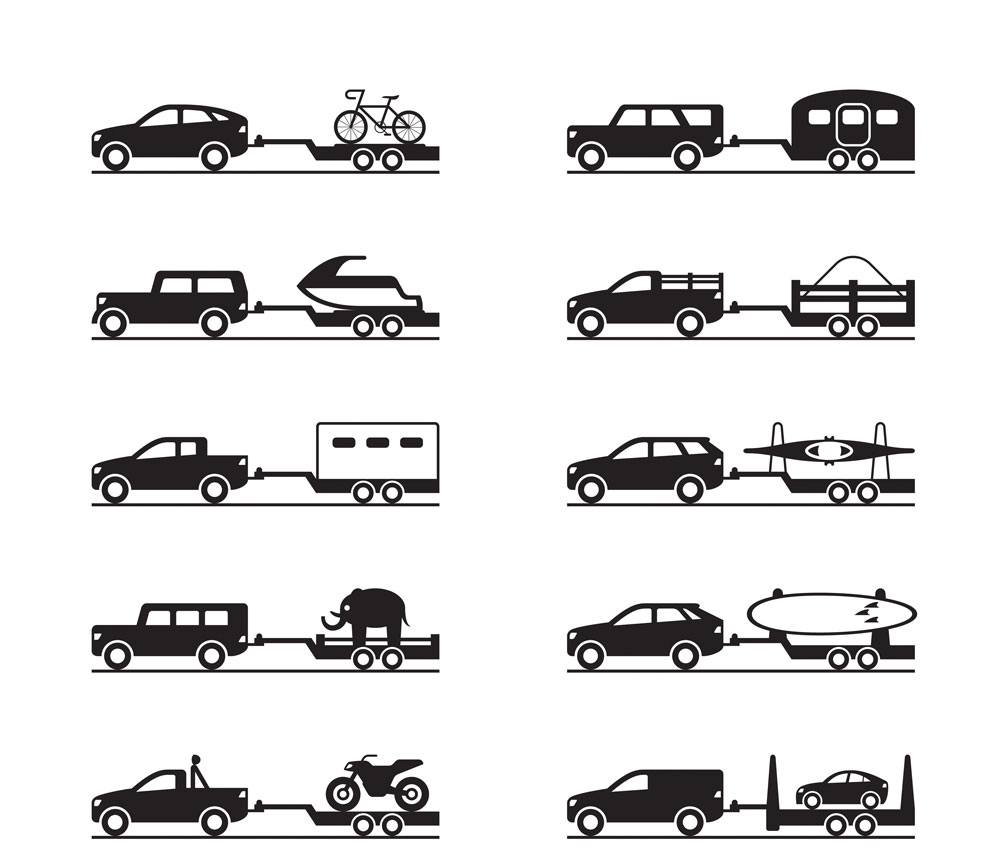
Different types of trailers
How to Wire your Car or Truck to Pull a Trailer
Every trailer needs brake lights, turn signals, and tail lights. Some also require side markers and running lights. Some brakes also require electricity—activating the electric brakes or disabling the hydraulic brakes when reversing.
Vehicle manufacturers sometimes connect wires to easy-to-use plugs under the car or behind the rear cargo area paneling. The easiest way to make this connection is to use a T-One connector, which has an OEM-style connection that plugs into the vehicle’s existing wiring harness, usually near the vehicle’s rear or tail lights. The T-One comes pre-wired with a 4-way flat trailer connection and can be expanded to a 5-way, 6-way, or 7-way trailer connection using a wiring adapter.
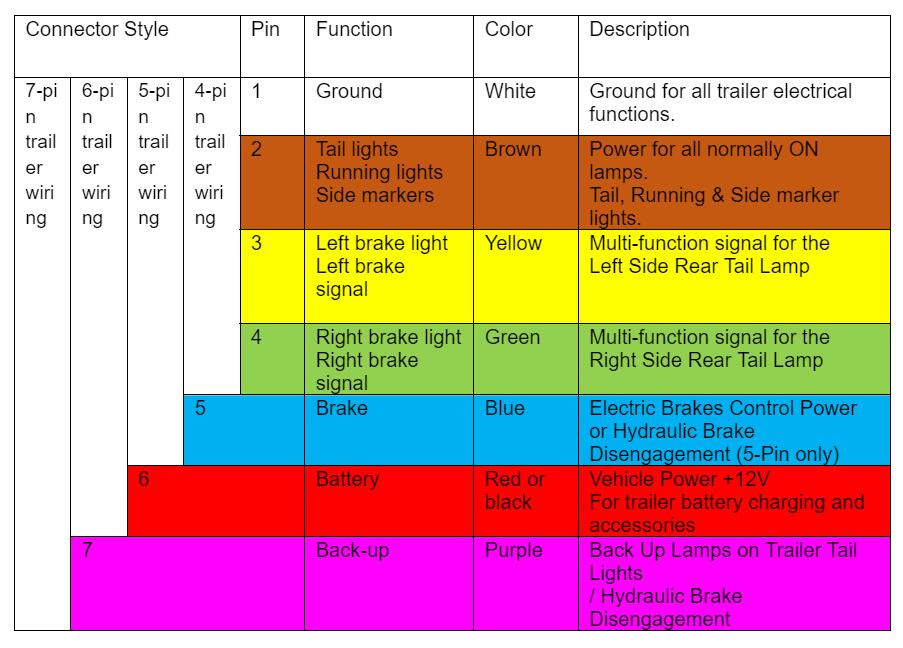
Caption: Colors Coordinate With Trailer Wiring Diagram
Trailer Wiring Harness notes
There are two wiring diagrams above that fit the requirements of most trailers. The first image shows the wiring for a single-axle trailer, while the second image shows tandem axle trailer wiring. In this, you will notice that everything is the same except the blue wires for the brakes and white wires for the ground.
You can use only the required wires and emit the others. For more axles, you can expand the same condition. For example, you can ignore the auxiliary power wire when not needed. Similarly, ignore the brake wires if there are no breaks on axles. However, do not change the PINs for cables Backup is not in use. Leave them not connected.
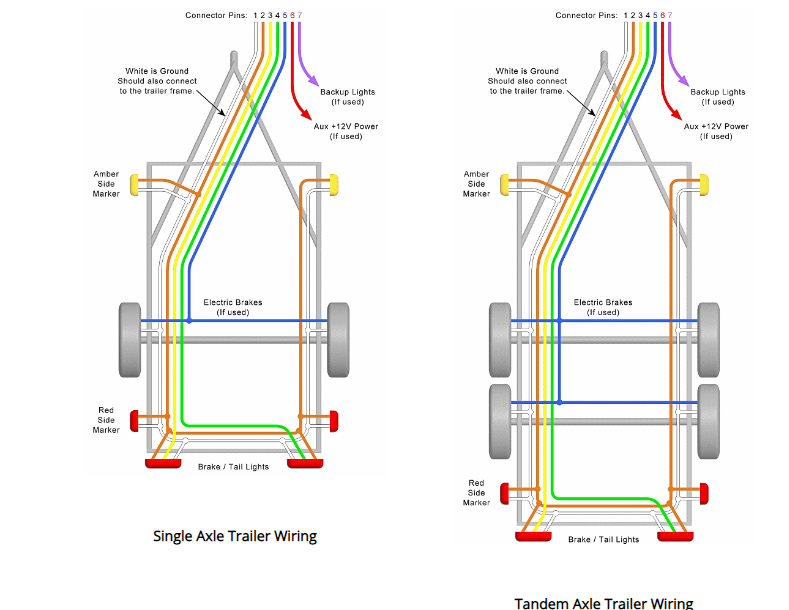
Caption: Typical Trailer Wiring Diagram and Schematic
Source: https://mechanicalelements.com/trailer-wiring-diagram/
Further, you need to pay attention to:
Three center marker lights:
The three central marker wire lights at the front and back are missing in the above wire diagram. Some trailers do not need them, while some others need them. For more details, you can check local ordinances.
In some trailers, there are three center marker lights which you may find at the central location or towards the lower side on the bumper or at the front. Please check your local jurisdiction for legal requirements for these lights.
In the USA, if your trailer is 80″ or more comprehensive and heavier than 10,000 lbs GVWR, you need a set of three red lights at the back. Also, you may need one at the top side in the back of the trailer height is more than a certain amount. You may also need a set of 3 lights at the top in the front if the size is more than a specific limit. Check the legal requirements of that particular region.
If the trailer is an enclosed cargo type, you need 3 center lights at the top of the trailer on the back, like at the top of the back doors. You can use lights on the back bumper for a flatbed trailer, even with a much higher load. There are various other laws in this relation, and you need to check the requirements for the specific trailer.
If you want some more marker lights, you can connect them to the white and brown wires like the side marker lights. You need not add more connections at the hitch but only some more wiring. It would be best if you kept these lights “ON” all the time.
Side note: reflectors
It is essential to check your jurisdiction so that you can light your trailer correctly. Trailers with a width of more than 80″ need reflective tape or reflectors alternating white and red on the back and the sides. If campers are longer than 30′, you must consider many heights and GVWR regulations.
Trailer breakaway wiring diagram:
A large number of trailers need to have a breakaway system. It is mainly a braking system through which you can apply breaks if your trailer gets disconnected from the towing vehicle. For campers above 3000lbs GVWR, it is essential to have this breakaway kit. Check laws for your locality.
When there are electric brakes, it involves trailer wiring. The above wiring diagram shows the trailer breakaway system inside, on, or under the trailer’s front part. There is a pin pull switch near the hitch. This whole system connects to the electrical system through auxiliary power (red wire + 12 VDC), which keeps the battery charged, ground (white wire) which completes the circuit, and brakes (blue wire) to start the brakes.
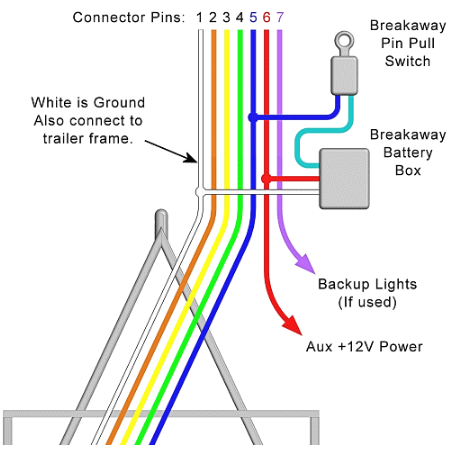
Caption: Trailer breakaway wiring diagram
Source: https://mechanicalelements.com/trailer-wiring-diagram/
Wire Routing:
Have you ever wondered where all these wires in the trailers go? Manufacturers protect all these wires around or into the frame for complete protection. You can use plastic conduits, flexible conduits, or other sources to cover the trailer wiring. It is not essential for the covering to be watertight but take care of the weather conditions to protect wires during splicing.
Wire size:
In wires, you can find different sizes. You can measure a wire size by its gauge; a smaller gauge number means the wire is thicker. For things that require high power, like brakes, a thicker wire of around 12 or 14 gauge is good. You must use 16 gauge or more prominent wires for the lighting system.
When lighting circuits use LED lights, they consume less power, even with many lights. Though lights need relatively small capacity, it is good to use 16 gauge or higher wires not because of the power requirements but because they are more robust, stronger, and have a larger surface area for easy splice connections.
Lights:
Though trailers never get submerged in water, they always get wet in heavy rain or during washing. It is always good to pick sealed and submersible LED lights. Also, contact high-quality lights even if you have to pay a few extra dollars, as you will enjoy a trouble-free operation.
White wire notes:
The white wire indicates the ground or negative wire that connects to the vehicle’s battery “minus the side. The trailer wiring diagram shows that this wire goes to all the brakes and the lights. Also, this wire connects to everything that uses Aux power and backup lights.
Some manufacturers connect this wire to a frame; following this, they join the ground from all accessories and lights to this frame. Though this works, the electrical problems in the trailer often come through the ground portion only. Thus, it is much better to run the white wire with all others and then connect the ground from each light to the white wire. Though it will take some more time, it will reduce your problems later.
The size of the white wire should be at least up to the largest wire in the wiring harness. A small white wire will also do if the circuit only has a light, which is too LED. However, take a larger wire with auxiliary power or electric brakes.
Brown wire notes:
These lights are running lights, side markers, corner backups, and the low-intensity areas of the tail lights. The brown wires go to all those lights, remaining ON backup travel. The 3 central lights at the back and front of the trailer come in this category if used. You will have to check local laws for the requirements of types of sunshine in your trailer.
The above trailer wiring diagram does not include 3 central lights, but they are essential in various situations. You do not need these lights on DIY utility trailers; however, if you use them, the brown wire feeds them power.
It would be best if you only had brown wire feed power to lights. So, take the wire that is appropriate according to the power requirements. A small gauge wire is fine for a small utility trailer, but you need a larger gauge for a large enclosed trailer with numerous lights.
Blue wire notes:
In some places, the 5th pin is for reverse lights. However, in trailers, the blue color is for the brakes. Further, if some trailers have surge hydraulic brakes, you can use this 5th pin to disable the brakes during reversing of the vehicle. In the above trailer diagram, there is no reverse light but if it is there, connect the blue wire to the reverse lights. However, make a note of what you have done. Instead, you can use a purple wire and label it accordingly.
Always be careful when you are using the 5th pin connector. Make sure that the car functions are matching with that of the trailer.
When it comes to the size of wires in brakes, don’t hold back yourself. Use a 14-gauge wire for a single axle and a 12-gauge wire for tandem axles.
Red wire notes:
The auxiliary power pin connects to the red wire. However, at times, it also relates to something like black wire. You can call it Auxiliary power, aux power, accessory power, or Batt 12V+. It connects to the positive DC power of the tow vehicle. You can use auxiliary power to charge the RV batteries, Breakaway battery, interior lights, and give power for accessories.
The red wire routing is optional and is different for every trailer. In trailers having a breakaway system, the red wire connects to the breakaway battery box to keep the battery charged. You can leave the pin when you do not need any separate power. However, when using, ensure you protect the electric system through fuse or circuit breakers. Further, protecting the system from battery draining problems is also good.
You can take a wire of different gauges depending on the power requirements for the red wire. If you need red wire only for the charging breakaway system, a 16-gauge wire is good to go. For more power, use 12 gauge or 14-gauge wires.
Protecting the wires:
Whatever wiring you do, it is essential to protect them. Generally, it would help if you had hollow frames for routing the wires. You can use a rectangular steel tube for routing, but it becomes difficult to seal the line ends to keep the moisture out. Under the trailer bed, you can keep light and wire connections out of the frame tubes.
If you think that you may need to change the wires over time, leave some access to those wires. On the contrary, if you will not change wires, you can make them super tight.

Behind the truck
Conclusion
Not all trailer wires are compatible with your car, truck, van, or SUV’s wires. Luckily, Cloom manufactures custom wiring harnesses with everything you need to keep your trailer lights running safely. You can choose from Flat Adapter, Flat Trailer Connector, T-connectors, Trailer plugs, Wiring converters, Wiring connectors, adapters, trailer brakes, and enhanced weatherproofing to keep towing safe for you and the drivers around you. Best of all, our custom wiring harness can