
Besides enhancing the aesthetic appearance, your vehicle’s headlamps significantly affect safety while driving at night. When the headlights stop working, there can be multiple reasons for the same, and it may be one of its components like the relay or fuse or the bulbs themselves. Here, we will study the headlight relay wiring.
Table of Contents
- Why does the headlight bother with relays?
- How to solve the voltage drop?
- Headlight relay kit instructions
- Protecting the Circuit
- Wiring Diagram of Headlight Relay
- Wiring headlight relay yourself
- Conclusion
Why does the headlight bother with relays?
The headlight switch controls the headlights’ power. In vehicles manufactured up to the late 90s, the current for the headlights passes through the button. It means long and thin wires carry current to and from the switch. Mostly, these thin wires were not enough for the original equipment headlights. Sometimes, manufacturers use lower gauge wires than required, decreasing voltage and diming the headlight over time. Further, a tiny bit of voltage drop affects a more significant bit of headlight brightness.
Understand this with an example. Suppose there is a bulb with an output rated up to 1000 lumens at 12.8 volts.
Now see how the bulb operates with the fall in the voltage:
14.5V: 1528 lumens
14.0V: 1356 lumens
13.5V: 1198 lumens
13.0V: 1054 lumens
13.0V: 1054 lumens
12.8V: 1000 lumens
12.5V: 923 lumens
11.5V: 695 lumens
11.0V: 597 lumens
So, when the voltage drops to 95%, the headlight produces only 83% of the rated output. Also, when the voltage drops to 90%, the rated output of the bulb drops to 67 percent. Thus, the factory-fitted headlight circuits start showing this kind of voltage drop over time due to the accumulation of dirt and corrosion. The cars with a lighting module to send signals to the headlamps also face this problem.
In a headlight on/off switch, a single wire goes to the beam selector, and two wires run from the beam selector to the front end of the car, one for low beam and the other for high beam headlights.
How to solve the voltage drop?
The simplest way of bringing full power from the source (battery or alternator) to the destination (headlamps) is to reduce the length of the power path between the two. Also, you have to increase the wire gauge and the electric current carrying capacity of that power path. However, simultaneously, the fact is that you have to control the headlamps from the driver’s seat. So, what can you do?
It’s simple, install Relays!
A relay is a small and simple device that can make or break a circuit and thus send or stop the current flow to the desired device. It is a simple electrically-operated switch, and the power runs to the relay when you put on the headlight switch. As a result, the relay completes the circuit by sending current from the battery to the headlamps. The thin wires which were inadequate in powering headlamps earlier are now enough to power the relays as relays need only a tiny amount of power to operate (only one or two watts of power).
Here, you are using relays with high current carrying capacity so that you can also use heavier gauge wire, which has a high current carrying capacity. As a result, you can take total power to the headlamps without any voltage drop.
Headlight relay kit instructions
Follow these steps to install the relay kit in your headlight system:
Step 1
Firstly, disconnect the battery before you start any work in the vehicle’s electrical system for safety purposes.
Step 2
Now, pick a location for relay installation in the engine compartment. Ensure that wires are long enough to reach the headlight relay harness easily.
Step 3
Now, take out the actual relays from the wire assembly. The plastic relay holders have holes in their mounting tabs, and use them to mark the holes’ locations for screw mounting.
Step 4
Now, drill the holes at the marked locations and fix the relay holders into place with the help of screws. When you install the relay holder, reinstall the relays.
Step 5
Next, you have to hook the wiring. Solder the ground wire with the existing ground wire. You can also secure it to the chassis at the harness ground with the help of a supplied ring terminal.
Step 6
Now connect the white/blue wire from the relay to the white/blue in the headlight harness and the blue/red to the blue/red of the saddle. Some cars have a light switch and a dipper switch/dimmer switch; in others, the dimmer switch is built into the headlight switch. For these switches, the larger blue/white wires from one relay connect to the high beam bulbs, while the large red/blue wire from the other relay connects to the low beams.
Step 7
The large red wire provides power to the headlamps. It is advisable to wire this to the starter solenoid with the help of the supplied ring terminal. If you have found the power source, cut the wire to the desired length, crimp & solder it to the suitable connector. With this, you can give battery power directly to the headlights when turned on.
Step 8
Next, confirm that you have secured and sealed all the connections. Ensure that there is no exposed connector.
Step 9
Now, it’s time for testing. Reconnect the battery and test your vehicle’s headlights. When you switch the lights, you will hear a slight click from the relay. If everything is working well, go to the next step.
Step 10
Secure and clean the wiring with the help of electrical tapes and cable ties.
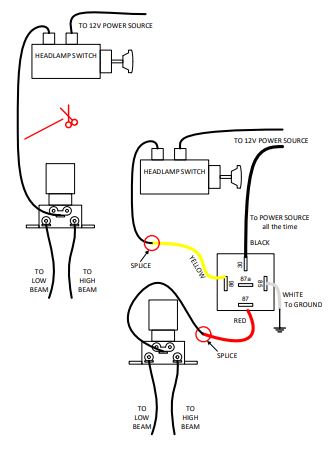
Caption: wiring headlights with relays
Source: https://vintageautogarage.com/content/product_description/RLK1-V5.pdf
Protecting the Circuit
For headlight systems, you can use ways to protect your circuit.
Use proper relays
Always pick a relay with a higher capacity than expected. Sometimes relays come in similar packaging but with different current ratings.
- Waterproof relay: this relay comes with a connector. You can use this for the engine bay or where components tend to get wet.
- Bosch/DIN relay: this is a standard ice cube relay with many mounting options.
- Micro relay: you can use these tiny relays in compact spaces, but use at least a 20 amps version to make it functional.
- Also, don’t forget to take the sockets for the relays. The size of the socket also varies with the relays, so if it is a micro relay, the socket will be smaller.
Amp fuse For Automobiles
Fuses are the best option to protect the circuit as they go off whenever the current exceeds its set value. And the best one for high current applications is the Maxi-Fuse size as they are an excellent option for high-energy halogen replacement bulbs. Secondly, you can also use standard ATO (Automotive Aftermarket) blade fuses.
Common Maxi-fuse Amp Ratings for different colors:
- Yellow – 20 Amps
- Green – 30 Amps
- Orange – 40 Amps
- Red – 50 Amps
- Blue – 60 Amps
- Brown – 70 Amps
- Clear – 80 Amps
- Purple – 100 Amps
To calculate the current ratings of the fuse, you must know the current drawn from low or high beams. When you switch on your headlights, two lights are turned on.
Let’s calculate the fuse required for typical H-4 halogen headlights with a 100-watt bulb.
Suppose
The voltage of the car’s battery is 12 volts (approximate value)
There are two bulbs of 100 watts each.
The current that two bulbs will draw at 100 watts is: 16.7 Amps
(The simple formula to calculate current is-
I (current in amps) = P (Power in Watts) /V(Force in volts)
So, Current= 100watts/12 Voltage = 8.34 Amps (for one bulb)
For two bulbs, it is 16.7 Amps.
So, when you have two bulbs that draw 16.7 Amps of current, you need a minimum of 20 amps to fuse the circuit.
Wire capacity
When discussing fuses, it is essential to use a thick wire that is enough for high-power connections to the bulbs and the relays. Relays take a small amount of current, but bulbs use a lot. You can use an 18 gauge wire for relay control, but you must take a thicker wire for headlights and power. It is advisable to use a 10-12 Gauge wire from the battery to the fuse and then to the relays. Further, from each relay, which is close to the vehicle’s headlights, use no less than a 14 Gauge wire. Taking a 12 Gauge wire will be much better because the thicker the wire, the lesser the voltage drop.
Wiring Diagram of Headlight Relay
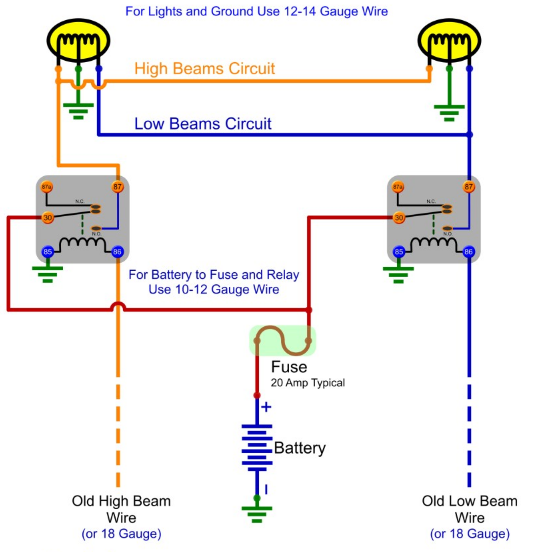
Caption: Headlight Relay Wiring Diagram
Source: http://www.gtsparkplugs.com
With the above-shown circuit, you can use the existing headlight to control two relays near the lights. Here the wire that carries power from the battery to the fuse and relay from the battery should be a higher gauge wire. As the battery wire is longer than the wire that goes to the headlights from the relay, it should have a thick gauge. As the wire thickness increases, it becomes better. Use the present headlight wires for relay controls, one for low and another for high beams. If you are installing a new relay, you can activate the relay with a footswitch or turn stalk.
The green inverted Christmas tree-like figure is GROUND. This wire connects the vehicle’s chassis. Ensure that the connection is rust-free here.
Some vehicles have two headlights on each side instead of one. In such cases, the wiring will be the same. However, one wire will go to the ground from each bulb.
Wiring headlight relay yourself
Raw materials required
- Two 30 Amps NO SPST relays (Automotive-style)
- Two fuse holders with 20 Amps fuses
- 12 feet, 12-gauge wire
- 3-4 feet of 18-gauge wire (it is good if you use different wire color)
- 3-4 crimps on ring terminals
- Eight crimps on ¼” female sockets or terminals for relays
- Few crimps on butt splices
- Zip ties for mounting and securing wires cleanly.
- A pair of headlight sockets to fit your headlight bulb.
Procedure hints
- Firstly, disconnect the battery’s ground terminal before starting any work.
- When taking the wires, ensure they are a bit longer than you need. Always leave 6-12″ extra wires for unexpected problems and easy workability.
- Now use yellow and white wires that connect to the left side headlight bulb to supply the signal to the relay.
- Connect the fuse holders immediately after you set the connection with 12 volts for wiring protection. Get the 12-volt supply from the alternator output post or the battery positive terminal.
- Keep all the connections simple, neat, and clean to avoid short circuits.
- You can use bolts or screws for setting ground connections. It will make it simple to connect wires.
- Ensure that all the wires have been placed neatly and carefully, so they do not scrape or get exposed to very high temperatures. Pay special attention to the belts, suspension, steering, and rotating parts. Zip ties all the wires to keep them in place.
- Using a 20 Amps fuse with 12-gauge wire can support 200 watts of headlamps on each side. Thus, it can work even if you opt for a headlight upgrade.
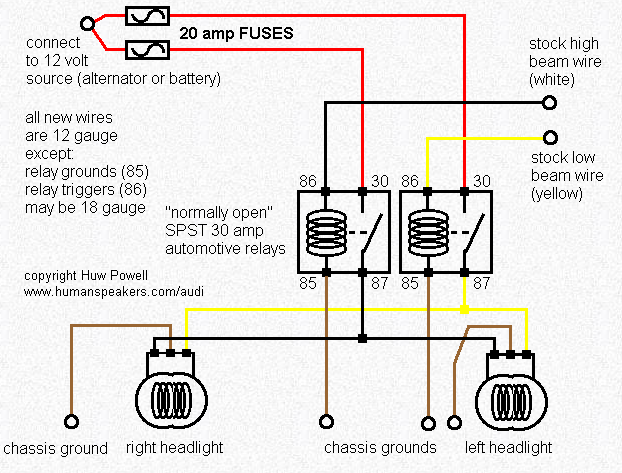
Caption: How to wire headlight relays
Source: http://audi.humanspeakers.com/
Conclusion
Whether replacing an old relay or installing a new one, the most important thing is to get a suitable harness for the headlight system. The correct headlight relay wiring harness ensures the proper current flow from the source to the destination without any loss. If you want a high-quality one, Cloom is here to help you.