
About Ethernet Cable Socket, Regardless of how great your WiFi can get regarding throughput and range, it will never get as good as a standard copper cable.
Copper wires are way more reliable and faster in comparison to WiFi. Therefore, you’re probably in this article trying to figure out how to perform ethernet cable socket installation.
Table of Contents
- What Is an Ethernet Cable Socket?
- Color-Coded Wiring Diagram of an Ethernet Cable Socket
- How To Install an Ethernet Cable Socket
- Conclusion
What Is an Ethernet Cable Socket?
You can install an ethernet cable wall/socket/ keystone jack in the walls of your office or home, creating an easier way to plug in your ethernet cable and connect to the internet.
On the front side of the keystone jack, you can see the female RJ45 connector.
While on the backside, you’ll see eighth metal grooves where the eighth color-coded twisted pair of wires need punching down.
Often you’ll find the jack featuring a color-coded wiring diagram which helps you find your way around everything.
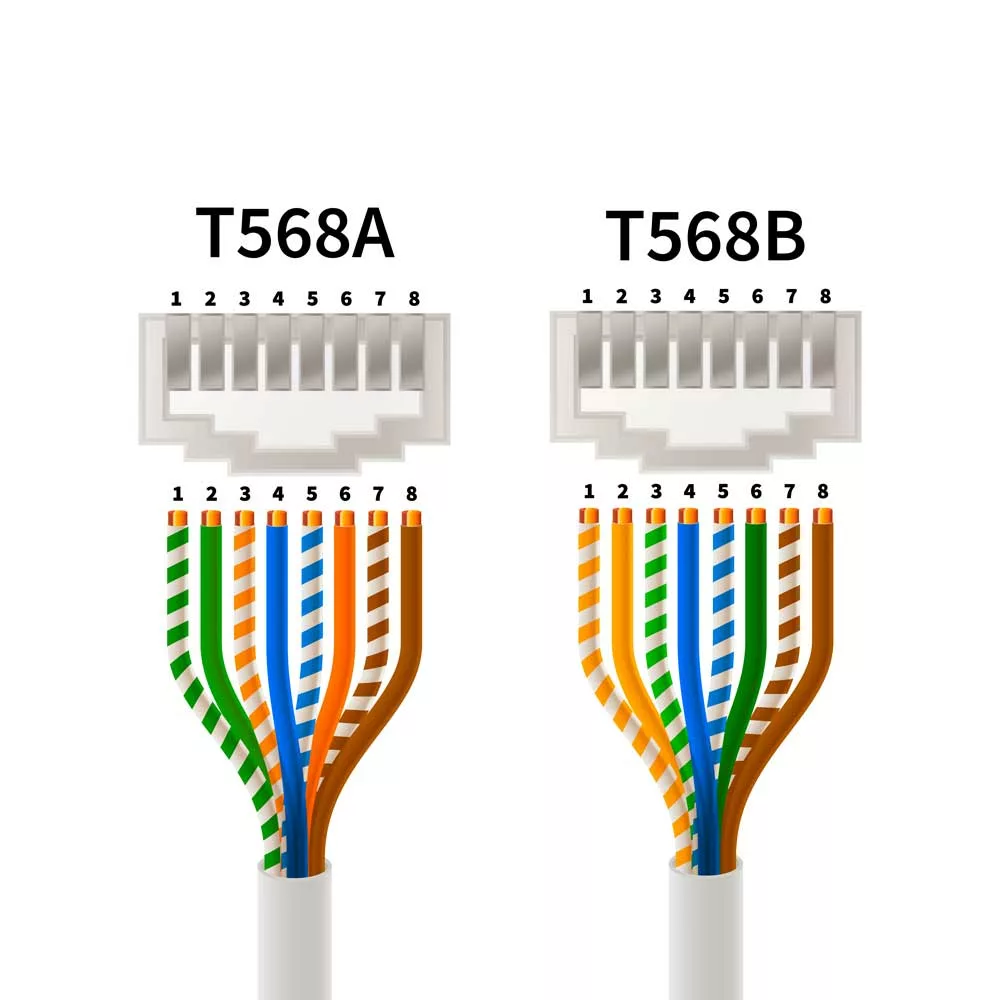
Caption: correct order of the wires
Color-Coded Wiring Diagram of an Ethernet Cable Socket
The ethernet wiring standards include T568B and T568A. Most ethernet connectors often have a wiring diagram of both standards and sometimes no diagram.
The standard you use doesn’t make much difference because both standards use straight-through configurations.
So the wires starting from the first to the eighth pin connect to their respective pin on the opposite end unless you want to try to make a crossover cable.
It’s important to remember that it’s best to use a single standard to maintain consistency.
If you’re looking for an ethernet, you’ll likely get one that follows the T568B because it’s the most common standard.
| Pin | T568A Pair | T568B Pair | T568A Color | T568B Color |
| One | Three | Two | Green/White Stripe | Orange/White Stripe |
| Two | Three | Two | Green | Orange |
| Three | Two | Three | Orange/White Stripe | Green/White Stripe |
| Four | One | One | Blue | Blue |
| Five | One | One | Blue/White Stripe | Blue/White Solid |
| Six | Two | Three | Orange | Green |
| Seven | Four | Four | Brown/White Stripe | Brown/White Stripe |
| Eight | Four | Four | Brown | Brown |
How To Install an Ethernet Cable Socket
Here are the steps on how to install an ethernet cable socket.
Step 1
Depending on your socket, you’ll need a punch tool to help you push down the wires into their connector. A punch tool isn’t expensive and will probably cost you under $5.
Step 2
Punch a hole into the back box, then thread the ethernet cable through the wall plate and back box. Then use a pair of wire strippers to strip off roughly 2cm to 3cm of the jacket.
This process will expose the 4 twisted pair of color-coded wires inside.
Step 3
Cut off the crosstalk separator and ensure you’re careful to avoid nicking the wires. Then use the extra piece from the cable jacket to unwind the pairs of wires.
Step 4
Keystone jacks come with a cable tie that holds the primary cable in position preventing the cable from straining. Therefore, thread it through the small hooks to tie it firmly in position.
This process will ensure the end of the cable jacket lines up beneath the base of the punch-down area.
Step 5
Arrange the eight wires in their grooves according to the ethernet color code on the label. It would be best to wire both ends with the same wiring standard, T568B or T568A. This is regardless of whether the opposite cable end terminates on a male RJ45 connector or wall socket.
Step 6
Using your fingers, arrange the eight wires and press the wires inside the grooves to the furthest point. Don’t forget to ensure you arrange the wires as neatly as possible without any unnecessary crossing.
Step 7
Once done, use the punch-down tool to push down all eight wires, splicing them into their metal grooves, holding them steadily in position and creating an electrical connection.
Step 8
Cut off the extra piece from the small cable tie and slide your keystone jack into your wall plate. Do not forget to clip it in. Then proceed to screw your wall plate into your back box.
Step 9
Our final step is testing the connection on all ends of the cable run via a cable tester. This process is purposefully done to ensure all the connections function before using it.
You will need extra patch leads if both ends of the cable run terminate to a wall socket.
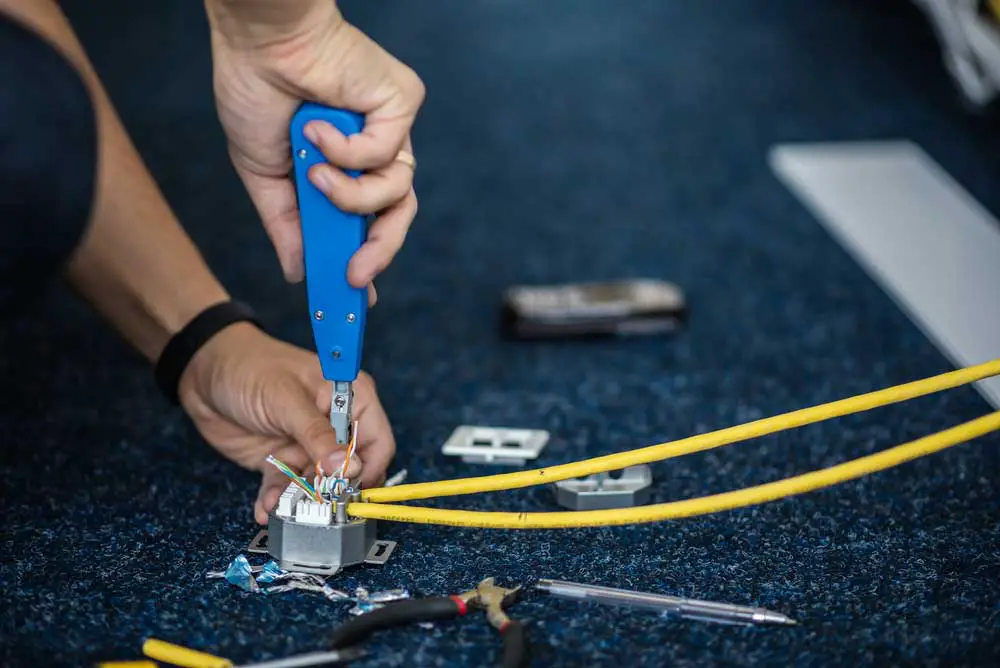
Caption: Man Using Punch Down Tool
Your cable tester will test all eight wires individually to ensure that all eight connections are correct and that it’s wired up right on both ends of the cable run in the correct or consistent order.
It sends a surge to each wire from your master to your remote.
You’ll see the series move repeatedly from one to eight while pausing in between on both ends of the cable.
If your cable run is too long, you can separate your master and the remote, then place one device on the opposite end of the device to test.
Conclusion
The main benefit of using an ethernet wall port is that it’s more secure than a WiFi connection.
This is because data transmitted over an ethernet connection can’t be accessed by anyone outside your business or home as long as every port is secured with a password and auxiliary security measures.
Also, since there are zero interferences from other devices, such as microwaves or phones, ethernet connections offer faster speeds than WiFi networks.
If you have any queries or require assistance, feel free to contact Cloom Tech.